
Welcome to the White Sewing Machine Instruction Manual, your comprehensive guide to understanding and operating your machine safely and effectively. This manual provides essential information on setup, maintenance, and troubleshooting to ensure optimal performance. By following the instructions carefully, you can master various sewing techniques and extend the lifespan of your machine. Designed for both beginners and experienced users, this manual serves as a valuable reference for years of creative sewing.
1.1 Purpose of the Manual
The purpose of this manual is to provide clear, detailed instructions for the safe and effective operation of your White sewing machine. It serves as a comprehensive guide to help users understand the machine’s components, proper maintenance, and troubleshooting techniques. Whether you’re a beginner or an experienced sewer, this manual ensures you can utilize your machine to its full potential, covering essential topics like setup, stitching, and care. By following the guidelines, you can enhance your sewing experience and extend the machine’s lifespan.
1.2 Importance of Reading the Manual
Reading this manual is crucial for understanding your White sewing machine’s operation, safety, and maintenance. It provides essential guidelines to ensure safe usage, prevent accidents, and maintain optimal performance. By following the instructions, you can avoid common mistakes, troubleshoot issues, and extend the machine’s lifespan. The manual also helps you understand the machine’s features, enabling you to use it effectively for various sewing projects. Taking the time to read and follow the manual ensures a smooth and enjoyable sewing experience.
1.3 Safety Precautions
To ensure safe operation, always unplug the machine before cleaning, oiling, or changing needles. Keep children away while sewing and avoid using damaged cords or plugs. Never submerge the machine in water or operate it near flammable materials. Proper ventilation is essential; keep air openings free from blockages; Follow all guidelines to prevent accidents and maintain your machine’s performance. Regular maintenance and correct usage will help you enjoy safe and efficient sewing experiences.
Understanding Your White Sewing Machine
Familiarize yourself with your White sewing machine’s components, stitch options, and accessories. This section helps you identify parts, understand features, and prepare for optimal sewing performance.
2.1 Machine Components and Parts Identification
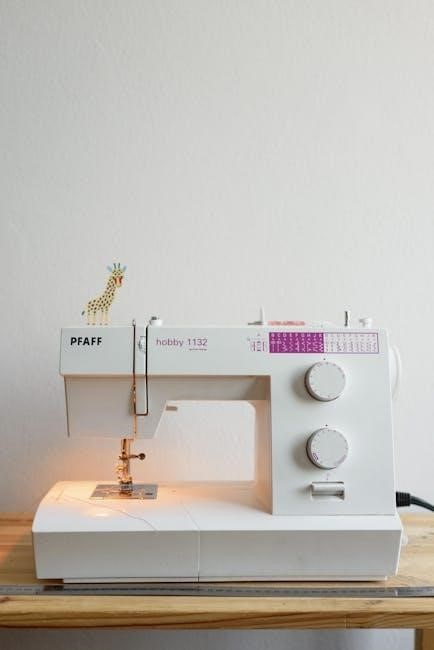
Understanding your White sewing machine’s components is essential for proper operation. Key parts include the bobbin, spool pins, stitch selector, and tension dials. The free-arm design allows easy access for sewing cuffs and sleeves. Locate the power switch, foot pedal, and reverse stitch button for basic controls. Familiarize yourself with the needle bar, presser foot, and feed dogs for fabric movement. Additional features like the extension table and specialized feet enhance versatility. Refer to the diagram in your manual for a detailed visual guide to all parts and their functions.
2.2 Accessories Included with the Machine
Your White sewing machine comes with essential accessories to enhance your sewing experience. These include a variety of presser feet, such as zipper, buttonhole, and blind hem feet, designed for specific tasks. Additional accessories like bobbins, needles, and a seam ripper are also provided. Some models include a free-arm sewing attachment for easy access to cuffs and sleeves. Refer to the manual for a complete list of included items and guidance on their proper use. Genuine parts and optional accessories can be found through authorized dealers or online resources.
2.3 Serial Number and Machine Identification
Locate the serial number on your White sewing machine, typically found on a metal plate or engraved on the machine’s body. This unique identifier helps determine the model, production date, and specific features. Record the serial number for future reference, especially for warranty claims or repairs. Ensure the machine’s identification matches the manual or official documentation to verify authenticity. This information is crucial for maintenance, troubleshooting, and ordering genuine parts. Always refer to the official manual or manufacturer’s website for accurate details about your machine’s specifications and compatibility with accessories. Proper identification ensures optimal performance and longevity of your sewing machine.
Safety Instructions
Ensure your safety while operating the White sewing machine by following essential guidelines. Always unplug the machine before cleaning or changing needles. Avoid operating it near water or with damaged cords. Regular maintenance and proper usage are crucial to prevent accidents and ensure optimal performance.
3.1 General Safety Guidelines
Always prioritize safety when using your White sewing machine. Read the manual thoroughly before operation. Keep loose clothing and long hair tied back to avoid entanglement. Ensure the machine is placed on a stable, flat surface. Never leave the machine unattended while in use, especially if children are nearby; Avoid operating the machine when fatigued or under the influence of medications. Keep the work area well-lit and clear of clutter. Regularly inspect the machine for damage or wear and tear. Proper maintenance ensures safe and efficient operation. Follow all safety guidelines to prevent accidents and prolong machine life.
3.2 Electrical Safety Precautions
Ensure the sewing machine is used with the correct power supply as specified in the manual. Avoid exposing the machine to water or moisture, as this can cause electrical hazards. Never operate the machine with wet hands or in a humid environment. Regularly inspect the power cord for damage or fraying and replace it if necessary. Always unplug the machine before cleaning, oiling, or performing maintenance; Keep the machine away from flammable materials and avoid overheating by ensuring proper ventilation. Follow these precautions to prevent electrical accidents and ensure safe operation.
3.3 Proper Use and Maintenance
For optimal performance, use your White sewing machine as described in the manual. Regularly clean lint and debris from the machine to prevent mechanical issues. Oil the machine at recommended intervals to ensure smooth operation; refer to the manual for specific instructions. Store the machine in a dry, cool place when not in use. Avoid exposing it to extreme temperatures or humidity. Proper maintenance extends the machine’s lifespan and ensures reliable service. Always use genuine parts for repairs to maintain warranty validity and safety standards.

Threading and Tension
Proper threading and tension are crucial for smooth sewing. Follow the manual’s guide to thread correctly and adjust tension to prevent issues like thread breakage or uneven stitching.
4.1 Step-by-Step Threading Guide
Start by unplugging the machine for safety. Remove any old thread and insert the new spool into the spool pin. Guide the thread through the tension discs, ensuring it’s seated properly. Pull the thread gently to test tension. Next, thread through the take-up lever and then through the needle. Leave a small loop at the needle eye and pull the thread tail to secure it. Always use the correct thread type for your fabric; Refer to the manual for specific threading diagrams and tips to avoid common mistakes. Proper threading ensures smooth stitching and prevents machine damage.
4.2 Adjusting Thread Tension
Proper thread tension is crucial for even stitching. Begin by threading the machine as instructed. Adjust the upper thread tension by turning the dial clockwise for tighter tension or counterclockwise for looser. Test the tension by sewing on scrap fabric. If the stitches are uneven, tweak the tension slightly and retest. For the bobbin thread, adjust the small screw on the bobbin case, ensuring balanced tension. Always use the correct tension settings for your fabric type to avoid puckering or loose stitches. Refer to the manual for specific tension recommendations.
4.3 Common Threading Mistakes to Avoid
Common threading mistakes include not cutting the thread at an angle, which can cause it to fray. Ensure the thread is properly seated in the tension discs and guides. Avoid overtightening, as this can lead to thread breakage. Incorrect bobbin placement is another issue; always insert the bobbin with the thread pulling to the left. Misaligning the needle thread can cause uneven stitches. To prevent these issues, follow the manual’s threading diagram and use high-quality thread. Regularly check tension settings to ensure smooth operation.
Basic Sewing Operations
Begin by setting up your machine, selecting the appropriate stitch type, and starting your first project. Ensure proper fabric handling and maintain correct thread tension for even stitching. Monitor the machine’s operation to avoid issues and extend its lifespan.
5.1 Setting Up the Machine for First Use
Unpack and inspect the machine for any damage or missing parts. Place it on a stable, flat surface and ensure proper power supply. Set up the sewing lamp for clear visibility. Follow the threading guide carefully to avoid tension issues. Wind the bobbin correctly and insert it into the machine as instructed. Finally, test the machine on scrap fabric to ensure even stitching and proper function before starting your first project.
5.2 Selecting the Right Stitch Type
Selecting the appropriate stitch type is crucial for achieving professional results. For straight-line sewing, use the straight stitch or lockstitch; Zigzag or stretch stitches are ideal for elastic fabrics or preventing fraying. Decorative stitches add embellishments, while reinforcement stitches ensure durability at seams. Always consult the manual to confirm stitch compatibility with your fabric type and desired outcome. Proper stitch selection enhances both the quality and longevity of your sewing projects.
5.3 Starting Your First Sewing Project
Begin by setting up your machine according to the manual’s guidelines. Ensure the machine is properly threaded and the tension is adjusted. Choose a simple project, such as a straight-seam fabric, to practice basic stitches. Place the fabric under the needle, aligning the edge with the machine’s guide. Gently press the pedal to start sewing, maintaining steady control. Practice on scrap fabric before working on your final project to build confidence and accuracy.
Advanced Sewing Techniques
Master advanced techniques like free-arm sewing, curved stitching, and using specialized feet for intricate projects. These methods enhance precision and creativity, allowing for professional-looking results.
6.1 Free-Arm Sewing
Free-arm sewing allows for greater versatility and control when working on cylindrical or hard-to-reach areas, such as sleeves, pant legs, or small projects. To use the free-arm feature, simply remove the extension table, exposing the machine’s free arm. This setup is ideal for sewing curves, hemming, or repairing delicate fabrics. Always ensure the area around the free arm is clear to avoid fabric bunching. Use the appropriate presser foot for your project to maintain even feeding and achieve professional results. This technique is perfect for intricate or detailed work, enhancing your sewing experience.
6.2 Sewing Curves and Corners
Sewing curves and corners requires precision and control. To achieve smooth curves, maintain steady fabric tension and use a shorter stitch length. For sharp corners, stop with the needle down, lift the presser foot, and pivot the fabric slightly before continuing. Marking curves with pins or using a guide can help maintain accuracy. Techniques like clipping seams or using a walking foot can prevent fabric from bunching or dragging, ensuring crisp, professional results. Practice on scrap fabric to master these skills and enhance your sewing projects with flawless curves and corners.
6.3 Using Specialized Feet and Attachments
Specialized feet and attachments enhance your sewing machine’s versatility. The zipper foot is ideal for sewing zippers and thick fabrics, while the buttonhole foot simplifies creating professional-looking buttonholes. Use the walking foot for heavy or layered fabrics to ensure smooth feeding. Attachments like the edge joining foot are perfect for binding seams. Always refer to the manual for proper installation and usage. Regularly clean and store attachments to maintain performance. For genuine parts, visit authorized dealers to ensure compatibility and quality.
Maintenance and Care
Regular cleaning and oiling ensure optimal performance. Store the machine in a dry place, away from dust. Use genuine parts for repairs to maintain reliability and longevity.
7.1 Cleaning the Machine
Regular cleaning is essential for maintaining your White sewing machine’s performance. Always unplug the machine before cleaning to ensure safety. Use a soft brush to remove lint and debris from the bobbin case, feed dogs, and other accessible areas. Gently wipe the exterior with a dry cloth, avoiding harsh chemicals. Never submerge any parts in water or use excessive moisture, as this can damage electrical components. Regular cleaning prevents dust buildup and ensures smooth operation. Refer to the manual for specific cleaning instructions tailored to your machine model.
7.2 Oiling the Machine
Regular oiling is crucial for maintaining your White sewing machine’s smooth operation. Use high-quality sewing machine oil, applying a few drops to the bobbin case, hook area, and other moving parts as indicated in the manual. Avoid over-oiling, as excess oil can attract dust and cause mechanical issues. Turn the handwheel gently after oiling to distribute the oil evenly. Oiling ensures reduced friction, prevents rust, and extends the machine’s lifespan. Always refer to the manual for specific oiling points and frequency recommendations to keep your machine running efficiently.
7.3 Storing the Machine Properly
Proper storage is essential to protect your White sewing machine from dust, moisture, and damage. Store the machine in a cool, dry place, away from direct sunlight and extreme temperatures. Use the original hard case or a sturdy cover to shield it from dust. Ensure the machine is clean and dry before storage. Avoid leaving loose parts or accessories exposed. For extended storage, consider unplugging and securing any moving components. Regularly inspect stored items to prevent damage. Proper storage ensures your machine remains in excellent condition for future use.

Troubleshooting Common Issues
This section helps identify and resolve common problems, such as thread breakage or uneven stitching. Check thread tension, ensure proper needle alignment, and consult the manual for solutions.
8.1 Machine Not Turning On
If your White sewing machine fails to turn on, first check the power source. Ensure the machine is properly plugged into a functioning outlet. Verify that the power cord is securely connected to both the machine and the electrical outlet. If using a surge protector, ensure it is turned on. Check for any tripped circuit breakers or blown fuses. Consult the manual for specific troubleshooting steps for your model, such as White 1477/1488/1499 or White 1000/1010. If issues persist, contact authorized service personnel for assistance.
8.2 Thread Breakage
Thread breakage can occur due to improper threading, incorrect tension, or using low-quality thread. Ensure the machine is threaded correctly, following the manual’s guide for models like White 1477/1488/1499. Check the tension settings and adjust them as needed. Use high-quality thread suitable for your fabric type. If issues persist, re-thread the machine, ensuring the presser foot is up. Consult the troubleshooting section for specific guidance, such as for White 1000/1010 models, to resolve thread breakage effectively and maintain smooth sewing operations.
8.3 Uneven Stitching
Uneven stitching can result from incorrect thread tension, improper bobbin installation, or misaligned fabric. Ensure the bobbin is correctly seated and the presser foot is lowered. Check thread tension settings and adjust them as needed for consistent stitches. For models like White 1000 or 1010, refer to the manual for specific tension adjustments. Use the appropriate needle size for your fabric type to maintain even stitching. If issues persist, clean the machine to remove debris that may affect stitch quality. Proper maintenance ensures smooth, even stitching across various fabrics.
Accessories and Attachments
Explore optional feet and attachments designed to enhance your sewing experience. Discover how specialized accessories like zipper, buttonhole, and walking feet can improve precision and versatility for various projects.
9.1 Optional Feet and Their Uses
Optional feet enhance your sewing machine’s functionality. The zipper foot is ideal for sewing zippers and thick fabrics, while the buttonhole foot simplifies creating precise buttonholes. The walking foot excels at handling heavy or layered fabrics, ensuring smooth stitching. Additional feet like the blind hem foot and overlock foot expand your machine’s capabilities, catering to specialized tasks. These attachments empower you to tackle diverse projects with ease and precision, maximizing your sewing experience.
9.2 Additional Accessories for Enhanced Functionality
Enhance your sewing experience with optional accessories designed to expand your machine’s capabilities. An extension table provides a larger work surface, ideal for quilting or managing bulky fabrics. Extra spool pins allow for quick thread changes, while specialized presser feet cater to specific tasks like zipper installation or blind hems. Additional accessories, such as a seam guide or quilting kit, can further customize your sewing process. These tools empower you to tackle a wider range of projects with precision and efficiency, making your sewing journey more enjoyable and productive.
9.3 Where to Find Genuine Parts
For authentic White sewing machine parts, visit the official White Sewing Machine website or authorized dealers. Genuine components ensure compatibility and performance. You can also check authorized service centers or trusted online retailers. Be cautious of counterfeit products and verify the seller’s legitimacy. Specific models, like White 1477 or 1010, may have dedicated sections on the official site. Always refer to your manual for part numbers to ensure accuracy. For vintage or discontinued models, ISMACS or specialized sewing communities may offer support, though they do not provide valuations.
Downloading and Referencing the Manual
The White Sewing Machine manual is available for free download as a PDF or text file from the official website or trusted online sources. Always refer to the official manual for accurate information and safe operation. Save it for future reference to ensure proper maintenance and troubleshooting of your machine.
10.1 Finding the Official Manual Online
To locate the official White Sewing Machine manual, visit the manufacturer’s website or trusted online platforms like ManualsOnline or Singer’s official site. Manuals are available as free PDF downloads, covering various models such as White 1477/1488/1499, 1000, and 1010. Ensure you download from reputable sources to avoid counterfeit versions. These manuals provide detailed instructions, safety guidelines, and troubleshooting tips to help you make the most of your sewing machine and ensure optimal performance and longevity.
10.2 Saving the Manual for Future Reference
After downloading the White Sewing Machine manual, save it to a designated folder on your device for easy access. Consider printing a hard copy for offline use. Organize your digital files in a clearly labeled folder, such as “Sewing Machine Manuals,” and back up the file to cloud storage for added security. This ensures you can retrieve the manual effortlessly, even if your device is lost or damaged. Regular updates to your storage system will keep the manual readily available for future reference and troubleshooting needs.
10.3 Navigating the Manual’s Contents
Navigating the White Sewing Machine manual is straightforward due to its clear organization. Use the table of contents to quickly locate specific sections, such as safety guidelines, threading instructions, or troubleshooting tips. Each section is categorized logically, ensuring easy access to information. Additionally, most digital versions allow keyword searches, enabling rapid retrieval of details on stitch types or maintenance procedures. This structured approach ensures users can efficiently find the information they need, making the manual a practical resource for both beginners and experienced sewists.
Tips for Beginners
Start with simple projects to build confidence. Practice on scrap fabric before sewing actual garments. Always read the manual thoroughly and follow safety guidelines.
11.1 Starting with Simple Projects
Beginners should start with simple projects like straight-line sewing or hemming to build confidence. Practice on scrap fabric before working on actual garments. Start with basic tasks such as sewing a straight line or repairing small tears. Gradually move to more complex projects like pillowcases or tote bags. This approach helps develop essential skills and familiarity with the machine. Always refer to the manual for guidance on selecting the right stitch type and thread tension for your project. Patience and practice are key to mastering sewing techniques.
11.2 Practicing on Scrap Fabric
Practicing on scrap fabric is essential for mastering sewing skills without risking damage to your final project. Use leftover material to test stitches, tension, and techniques. Start by sewing straight lines, then gradually explore curves and corners. This practice helps you understand how the machine handles different fabrics and thread types. It also allows you to familiarize yourself with the machine’s settings and accessories. Remember, patience and consistent practice are key to improving your sewing abilities and achieving professional results;
11.3 Common Mistakes to Avoid
When using your White sewing machine, avoid common mistakes such as improper threading, incorrect tension settings, and using the wrong needle type. Neglecting to backstitch at the start and end of seams can lead to loose stitching. Forgetting to presser foot down or pulling fabric while sewing can cause uneven stitches. Always use the correct accessories for your project and avoid sewing over pins. Regularly cleaning and oiling the machine prevents mechanical issues. By avoiding these errors, you ensure smooth operation and professional-quality results.
12.1 Summary of Key Points
This manual provides a detailed guide for operating and maintaining your White sewing machine. Key points include reading the manual thoroughly, following safety precautions, understanding machine components, proper threading techniques, and regular maintenance. Troubleshooting common issues and using genuine accessories are also emphasized. By adhering to these guidelines, you can ensure optimal performance and longevity of your machine. Keep this manual handy for future reference and enjoy exploring the creative possibilities of sewing.
12.2 Encouragement for Further Exploration
With the knowledge gained from this manual, we encourage you to explore the full potential of your White sewing machine. Experiment with advanced stitches, try new fabrics, and tackle complex projects. Visit our official website or authorized dealers for additional resources, tutorials, and genuine parts. Join sewing communities to share ideas and learn from fellow enthusiasts. Sewing is a skill that grows with practice, so keep creating and pushing your creativity to new heights. Happy sewing!